Now that we are settled in from a whirlwind Thanksgiving holiday weekend it’s time to buckle down and wrap up all of my Christmas DIY projects that I started several weeks ago. This drizzly weather prevented us from getting our Christmas tree Sunday and Monday (ugh), but it worked out for the best since I still had a few ornaments to finish assembling. Here is a recount of the progress, thus far:

This is what I started out with. Whoa nelly, am I sure glad the husband wasn’t home when I walked through the door with these bags in hand. I will say, Hobby Lobby was having a HUGE 50% off sale on all its Christmas décor and I had an additional 40% off coupon for one single non-sale priced item. Win!
PROJECT 1.

I searched high and low for glass ornaments of varying shapes. Unfortunately, I could only find the average round ones. However, I didn’t solely find glass ones; I found plastic ornaments! I know, glass is much nicer and would dreamily sparkle against the lights on the tree, but we have two cats…one of which is a maniac and a little unbalanced. That’s not to say that we don’t love him, it’s just that last year I probably swept up 6 broken ornaments that he clearly thought would be fun to play with. Not so much. Anyway, I bought a few bags of feathers ranging from white, brown, and a mixture of both. Instead of stuffing them with only one, I loaded them up. The more the merrier, right?


I also purchased some moss and stuffed a few with that too to switch it up a bit. When I was finished stuffing, I cut some twine to hang them with and voila, finito!


I also purchased some moss and stuffed a few with that too to switch it up a bit. When I was finished stuffing, I cut some twine to hang them with and voila, finito!


I think that they turned out quite nice.
PROJECT 2.

I am still debating whether or not this project was a nail or fail. I definitely think that it was more trouble than it was worth, as I am not a huge fan of hot glue guns due to the mess that they make and it’s hard to make fabric look good on a round ball. Anyone disagree? I started this project out with styrofoam balls, both large and small.


I bought some trimmings and cut several strips of burlap from scraps leftover from our wedding. I didn’t think too much about the thickness of the material and wish that I had. If you’re going to attempt this one on your own, use fabric and cut strips instead of buying ribbon or trimmings. I thought that I was taking the easy route by buying pre-cut, but I was wrong. Way wrong.

After hot-gluing the ribbon to the ball in an orderly fashion, I inserted a T-Pin at the top of the ball to hold it all together and attached the twine that I had cut from PROJECT 1 to hang it with.

This is what I ended up with:


They don’t look anything like the image I was trying to mock, but they are original and will still be hung.
I had a surplus of styrofoam balls so I decided to take the unused moss that I had leftover from the previous project and hot glue it to a couple of balls. It was a messy task, but I love them. I’m just worried that Coco and Goose are going to love them too.

PROJECT 3.

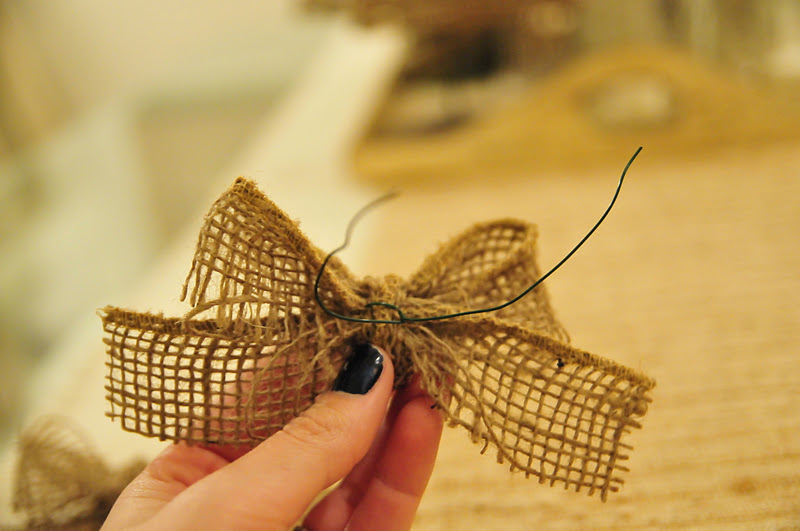
A big thank you goes out to my mother-in-law for collecting all of the pinecones for this project. They have trees, unfortunately we do not (condo life…whoop!). John also gets a shoutout for buying the rope for me at Home Depot. He goes there every day, fortunately I do not. I started by making the burlap bows out of burlap garland purchased from Michaels. So much easier than cutting strips from the burlap fabric by the yard like I did last year for our outdoor wreaths. I was just trying to make use of what we already had. Once the bows were made, I inserted wire in the back to use to tie them onto the rope.


Then, I got out the handy-(not so)-dandy hot glue gun and glued each bow to the top of a pinecone. Here’s the kicker: once I finished up the pinecones, I decided that I no longer wanted to attach them to the rope. Yes, it looks lovely in the picture, but I started to think about what it would really look like on the tree. I’ve never been a huge fan of garland so after a few glances back and forth with the hubby, we decided to just turn them into pinecone ornaments. Here is the finished product:


Then, I got out the handy-(not so)-dandy hot glue gun and glued each bow to the top of a pinecone. Here’s the kicker: once I finished up the pinecones, I decided that I no longer wanted to attach them to the rope. Yes, it looks lovely in the picture, but I started to think about what it would really look like on the tree. I’ve never been a huge fan of garland so after a few glances back and forth with the hubby, we decided to just turn them into pinecone ornaments. Here is the finished product:


PROJECT 4.

With the leftover pinecones, I decided to mimic this door adornment. I used both burlap garland and the extra ribbon that I used in PROJECT 2. This undertaking was SUPER easy. All you have to do is cut several strips of ribbon at the length of your choice (I cut 2 feet of each), glue a strip to the top of each pinecone, tie a knot at the top, and hang. It turned out really cute!


And lastly, here are a few more ornaments that I made using a lot of different goodies:
birds nests.
 |
| These are actually what I put my bridesmaid's gifts in. I wrapped with twine and yarn. |


bells.


birds.


and balls.


That’s all for now, folks. Nail or fail? You be the judge.


I can't wait to see everything on the tree! I have a feeling it will look like something from Southern Living:) Could you come to my house?!?!
ReplyDelete